Minimum Viable Product is a term that’s been getting a lot of attention. But what is a Minimum Viable Product?
The simple answer: the minimum viable product is a new product with enough features to satisfy early customers, and with plans in place to add more features over time. This allows you to get your product in front of the public before it’s finished, allowing you access to valuable feedback from real users.
#1 Start Small
You’re probably thinking “But my app idea won’t work without everything in it!” or “If I launch too early relative to competitors then I’ll be killed!”. Of course this isn’t true when it comes down to it because the majority of people don’t go on and use an app again, let alone a competitor’s.
Start small and iterate, you’ll release a better product in the end.
#2 Iterative Development
Rather than releasing an app onto the store that barely works, then spending months adding features before starting again from scratch with a different idea, keep your ideas simple and work on them in chunks. Set deadlines for yourself to add new features every two weeks or so, and stick to it! It might be time consuming but in the long run you’ll have a stronger product which users will love more.
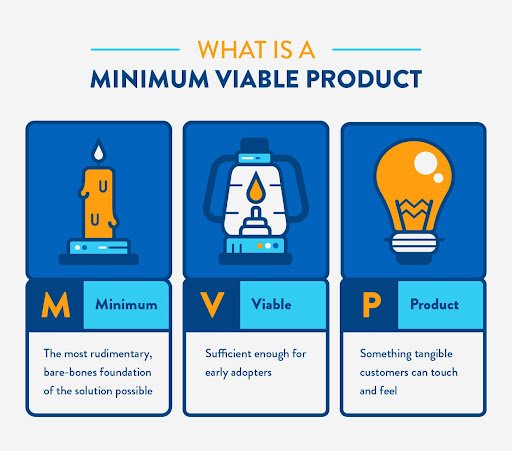
#3 The MVP is NOT a Minimal Product
Don’t think of the minimum viable product as being something skeletal, otherwise you’ll release too little too early… The minimum must include everything required to have a usable product, but it will be in an unpolished state. It’s crucial you get to this stage before launching otherwise no one will even see your app!
#4 Plan Before You Prototype
If you start prototyping without thinking about the next steps, you’ll end up with lots of half finished code – creating extra work for yourself later on. Take the time to plan out exactly what you want your app to do and how it should look before you begin coding. If anything, allow yourself more time for planning than completing your prototype in order to avoid rushing through this part too quickly.
#5 Don’t Rush Through the Technical Part
Developers are guilty of rushing through the technicalities of their project so they can get to the coding and start having fun. That’s a big mistake because it is hard to spend time on your app without knowing exactly how it should work and what needs to be developed. Before starting any technical part, you need to plan.
#6 Imagine Your App as a Finished Product
As you’re developing or planning your app, imagine that it already exists and someone else wants to use it – they will probably give you some useful ideas about how they might like it improved or what functionality they would like added! Stay open-minded at all times and make sure that everything you develop is testable by real people. Even if you think something isn’t going very well, don’t stop working on it until someone who doesn’t know anything about your app can test it out and understand what to do.
#7 Don’t Worry About Going Over-Budget
As long as the software is completed, the customer will be satisfied with the product, no matter how much you originally quoted for. If you think that there are several extra features that would enhance the app, then include them in your final figure – but do say that these are additional costs.
Some other tips are:
#1 Get Other People Involved
One of the best ways to test if an app idea could really work – especially if it’s something original or unusual – is to talk to people who aren’t involved in its development at all! Friends, family members and even strangers might have some great ideas about how or why someone would use your app – and they might even be willing to test it out for you.
#2 Give it a New Name
If there’s already an app on the market with similar features, find something unique about yours and build on that – so that customers will want to choose yours instead. Even if you’ve got all of these things right and your app is really useful and fun, you’ll still need to make sure people know it exists before they start downloading other apps!
#3 Know When to Stop
It’s easy to keep coming up with ideas about what you could add or change but think of it like a house – it has four walls, windows and doors for a reason! Make sure your app is fully functional before moving on.
#4 Decide What You Want Out of It
Apps can make money in lots of different ways – ads, online purchases, subscriptions or specific payments. They all have their own pros and cons so decide which one is right for you! If your app is free (and how awesome would that be) then consider putting ads in it. This way you won’t annoy people who like using your app but it will help pay the bills until you’ve made enough cash with other methods.